
Illustration post-production: scanning and editing artwork

In case of digital illustrations it is obvious how artwork is transferred to paper and how it is reproduced. For manual illustrations, the situation is not so clear. I mean after the scanning process. Scanning is only the first step of a long post-production procedure. So let’s see what’s brewing in the witch’s kitchen!
Why digital editing is necessary?
The artist may use traditional techniques to create artwork, but today it is practically impossible to avoid the digital world. You obviously edit pictures in the case of packaging illustration, for instance, but art prints are also prepared digitally before they are printed. Even illustration exhibitions present prepared prints sometimes instead of original pieces.
Post-production consists of digitizing the artwork, making corrections and even changing details, if necessary. When you work manually it is natural to make little – or sometimes not so little – mistakes, which can be easily corrected digitally. During scanning colours often get dull and if you use cold-pressed or rough paper, the texture may be visible on the scanned image, which is undesirable. All these make digital editing a necessary part of the illustration process.

So how is it all done?
The first step is scanning (surprise surprise…). I have tried several brands, currently I work with an ancient HP scanjet 2400 type scanner (which was a life saver, by the way, when I inherited it from my great-uncle). In my experience, however, no matter how high-end a scanner you use, you cannot avoid digital editing, so I’d say any type of scanner will do as long as it can record images in high enough resolution. Because resolution is key: whether you can enlarge your image without quality loss depends on resolution. If you want your image to be printed you should scan it in 300 DPI at least, but the higher the DPI the better. Depending on image size I usually scan my illustrations in 600 DPI, which has never yet resulted in quality issues.
Resolution will also affect your file size: the higher resolution, the bigger file size. My scanner would be capable of scanning my pieces in 800 DPI, but it would result in files so big that my laptop wouldn’t be able to handle it – nor do I need my illustrations to be that high in quality.
So resolution is about the most important thing you should set when scanning your artwork. You may want to change brightness/contrast settings and file format too. Personally I prefer to tweak colours in photo editing softwares but you should experiment with your scanner. As for file format I usually use JPG. Some might argue that JPG is a compressed format with quality loss, but for my purposes JPG-s have always worked fine. Those illustrators who are fussy about quality loss usually choose TIFF format, which is obviously bigger in file size.
It is important to bear in mind that there is no golden rule for scanner settings. The number of scanners the number of settings, so you need to experiment to find what works best for you. If you go to a print shop to have your artwork scanned, always ask to see the result before going home. This way you avoid unpleasant surprises.
Once the artwork is successfully on your computer, you can start editing. For that you’ll need a photo editing software – personally I prefer Photoshop, but there are other, cheaper or free softwares out there, which my be suitable for you.
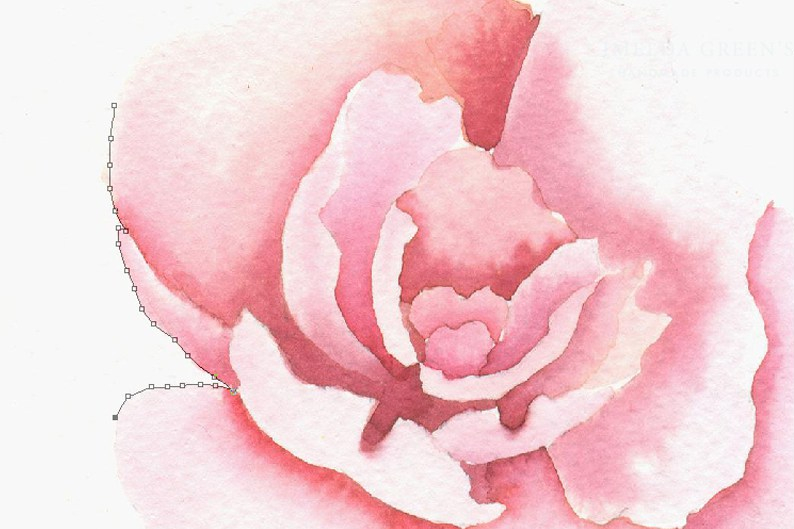
The first thing I do is to cut out the background. This way I don’t only remove unwanted paper texture but also those spots and eraser dust that are impossible to clear away before scanning. There are several ways to remove background, but only one worked for me really well – the most time-consuming one: I manually trace the illustration and then cut it from the background. Luckily Photoshop’s Magnetic Lasso tool finds the border between different colour/contrast surfaces easily, so this task can still be done reasonably fast. Some choose to brighten up the background into spotless white, which is a lot quicker but I have never managed to create just as ‘spotless’ a background as I’d wanted, and always found mistakes in the printed result. So I prefer to stick with the slow but sure method.
Once the background doesn’t distract me, I tweak colours a but. I usually just turn the colours a little more vibrant, but sometimes I add a warming/cooling filter. If the client wishes to change colours, I can easily increase/decrease brightness or contrast at this stage.
The last step is to correct small mistakes. Eraser dust does not stick on white backgrounds only, but also on painted surfaces, so some editing is always necessary. At this point it is possible to correct some unadmitted mistakes too, but this is a secret. :)
If I feel that there is nothing left to do, I save the illustration. I usually use PNG format for the final artwork, which enables me to keep the transparent background. This is important when the client wants to use the illustration in front of a coloured background or on a mockup.

Whether you are about to comission an artist or you are the artist yourself, these are the things to pay attention to:
- appropriate (high) resolution – 300 DPI or higher, so images are not pixelated
- background – namely, to not have any
- colour correction – so that you see the same vibrant colours on the screen as on your original
- cleaning spots – eraser dust is your enemy
Have you got a story about editing artwork? Have you tried scanning something that turned out to be different in print? Share your experiences with us!

